I think I’ve mentioned it before but that won’t stop me from saying it again, I love fries. Love em’!
What’s not to love? Seriously, you tell me because I can’t think of one thing.
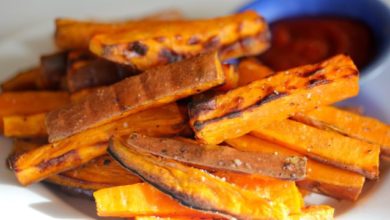
I also love sweet potatoes (what can I say, I just love food) so needless to say, these fries really do it for me; they’re the best of both worlds.
This recipe could not be any easier… basically all you have to do is cut your sweet potato into strips, season them and pop them in the oven for about 20 minutes. I love how the heat from the cumin partners with the sweetness of potatoes… SO GOOD! If you like to dip your sweet potato fries, you have to make creamy dipping sauce for sweet potato fries. It’s the perfect partner.
I must warn you though, although these fries are delicious, they don’t get very crispy or crunchy. They’re firm, but not super crispy.
I am playing with a few ideas to see if I can come up with a way to make them crunchier. I tried dipping them in egg first, but then they tasted like mini potato omletes. The egg flavor was too strong. I’m gonna try egg whites next… I think that may do the job.
(I can’t lie, taste testing sweet potato fries is a pretty fun job, so I don’t mind experimenting one bit;)).
Do you guys have any secrets behind crispy sweet potato fries?? If so, I’d love to hear about them… maybe together we can come up with the world’s most delicious baked sweet potato fries!!
UPDATE: My conclusion – I prefer the wired rack over dipping my fries in egg whites. It’s quick and simple and while still not super crispy, they are the perfect clean and delish weeknight fry!
Ingredients
- *Sometimes I pop these under the broiler right at the end just to get them a little extra brown but you could easily skip this step and still have yummy fries!
- 1 sweet potato1 tsp of olive oil OR cooking spray1 teaspoon of ground cuminSalt to taste
Instructions
- Preheat oven to 425.
- Cut the sweet potato into “fry-like” strips and pop them into a large bowl.
- Drizzle with one teaspoon of extra virgin olive oil OR spray them with some cooking spray. You just need enough to lightly coat the “fries”.
- Season with salt and cumin (in the video I use salt and pepper) and then lay them out on your wired baking sheet (demonstrated in the video).
- Bake for 20 minutes or until browned. Enjoy!
- Serves 1. (okay maybe two, but not if you like fries as much as I do)

Comments
Laurie says
I’m a TA in a high school autistic class. Two students (one in one class and one in the other) are on gluten free diets. I am excited about giving their moms your web site. One is really into food (sells cooking stuff for a chef:)), and the other is a nurse. I think both will enjoy your blog.
The latkes I made last night were great; sweet potato fries are a new favorite!
Thanks
Katie says
I’m struggled with the same issue many times! My best advice is the smaller and thinner, the better. A skinny fry = a crispier fry.
Kevin says
Those sweet potato fries look really good! I like the sound of using cumin with the sweetness of the potatoes.
Dani says
Laurie – Thanks for passing my site along. I think sticking to whole, nutritious foods is a huge benefit to any diet.
Katie – Good advice…thanks:)!
Kevin – It’s a yummy combination!
Psychgrad says
Just tried this recipe today. It was good! I’ll post pictures of the dinner on my blog within the next couple of days. Thanks.
Dani Spies says
Psychgrad – Great, can’t wait to check out your site:)
gizmar says
If you dip the sweet potato fries in egg whites before baking, they’ll be crispier.
Dani Spies says
Gizmar – That’s what I am gonna do next time…I’ll let you guys know how they turn out!
Tartelette says
I also dip mine in egg whites and sprinkle some chili powder on top.Works great! Thanks for reminding me it’s been too long since I have had some!
Jason says
I get my sweet potato fries crisp up much better in the convection oven. There’s something in that circulating heat that does the trick. I also spray them with a fine coating of olive oil and sprinkle cayenne pepper on the fries.
Dani Spies says
Tartlette – I am definitely gonna try the egg white trick…thanks!!
Jason – The convection…huh? I never thought of that!
Kindra says
A great dip for sweet potato fries is to make a curry mayo. Just mix some curry powder in with your mayo (or a low fat substitute to save some calories)…it’s so good! It’s a great combo for the sweet potato.
jade says
instead of cutting the sweet potato into strips, I slice it into round thin pancake shape, about half centemeter thick. Then I bake them for 10 minutes and add honey between two slices to make a honey sandwich out of sweet potatoes.
Dani says
Jade – OMG… a sweet potato and honey sandwich?? That sounds insane…YUM!! Thanks for the idea:)
Maggie says
I am excited to try these today. I found another recipe here
https://greenlitebites.com/2007/11/27/curried-sweet-potato-fries/
that calls for a longer cooking time. Perhaps that will help them crisp up. Longer time, hot oven, thin fries = crispy crispy crispy!
Dani says
Maggie – Thanks for the link… I’ll give it a try:)
Kaysha says
Hi there. First visit to your site, and I have to say that I love it! Not much of a cook now that I have kids. Odd, when I was single, I loved to cook. Now, I am just sick of watching my 3 girls and husband pick everything apart. I think with the simple and healthy nature of your dishes, I may actually enjoy cooking for my picky family and they may actually stop being picky.
I was prompted to write because I think I may have an idea for crispier sweet potato fries, keep in mind that I am online looking for ways to improve my cooking though! LOL! I have been checking out tons of recipes, seems like when they want something crispier or crunchier they tell you to turn off the oven and then let the item sit in the oven until the oven cools. Don’t know how great it would work on sweet potatoes, but I hope it gives you a fruitful idea.
Thanks for turning me back on to simple, healthy cooking!
Dani says
Kaysha – Thanks for the tips!! I will definitely give it a try b/c I LOVE sweet potato fries:)!!
Sandi Garth says
Thanks for the Baked Sweet Potato Fries recipe. I intend to use it for our Thanksgiving meal instead of creamed potatoes.
lori says
Crinkle the tinfoil before cooking lets the heat circulate around the fries.
Anisa says
I, just randomly stumbled across this site. I toss my sweet potato fries with egg whites, then with a few tablespoons of flour (I use whole wheat), along with the seasonings. This makes them very crispy!
Dani says
Lori – I’ll give it try. thanks!
Anisa – Oooh. Good tip, can’t wait to try them this way:)
katy says
I just tried making these! So easy and yummy! You are always my go-to site when I have a cooking question. When are we going for soul food?
Lisa says
I, too, have been on a quest for making my sweet potato fries more crispy… there are certainly a lot of good ideas here! Now, Dani, which have you tried and how well did they work? Thanks!!
carey Ellen Smith says
Quick note- Sweet potatoes aren’t that orange- what it looks like is yams. (lighter skin, weirder shapes are sweet potatoes) So, that said, I slice the sweet potatoes into fries, light coating of olive oil, 425 oven, 20 min then turn, 15 more minutes- or longer if you like them crunchy. Then sea salt and basil for seasoning. Garlic lemon mayo makes a great dip….
Dani says
Lisa – I have to tell you… I haven’t tried many. I need to get in the kitchen and do some sweet potato fry experimenting soon! I’ll keep you guys posted.
Carey Ellen Smith – Thanks for tthe tips!
Donna says
Try using a rack set on the cookie sheet and place sweet potatoes on the rack. Something about the heat circulating around the potatoes makes them crispier. I also seem to have better luck cutting into thin rounds instead of strips–as reader ‘Jade’ mentions above. I also stick to EVOO and seasonings versus the egg whites. Bake at 425 for about 20 minutes.
Peggy says
I am, as we speak trying the egg whites and flour combo. I also used some anise seeds instead of cumin…I will let you know how it turns out!!
Dani says
Peggy – Can’t wait to hear the results!! Thanks for sharing:)
Joy says
I make these quite often, but usually sprinkle with Chili Powder. I haven’t tried putting them up on a raised rack. Thanks for the tip. I will try that next time.
Healthy&Homemade says
Definitely doing these today with my hubbies dinner. I had tried it before but didn’t think to use the little cooling rack so of course half were soggy and half were burnt. I have about 5 sweet potatoes begging to be turned into crispy delicious treats!!! 🙂 YUM! Thanks!
Dani says
Lucky hubby;)
Julie says
Your photo just makes me wanna go to the grocery store NOW and grab some sweet potatoes!
Absolutely love your site and thanks for the update, Dani!
Note on the crispiness of the fries…I let them sit in the water usually about 30-60min, depending on how crispy I want my fries to be. Then I rinse them again and pat dry them with towel. I use this method to make what I call sweet potato “chips” and all I do is chop the sweet potatoes into discs instead of strips. This seems to work well for me, maybe you should give it a try 🙂
Penelope says
So yummy! I have a question: do you have any suggestions in keeping the fries from getting soggy when I pack them for a snack-to-go? I always end up with soggy sad fries when I do. 🙁 (but out of the oven they are so so yummy!!)
Ali says
After I cut the sweet potatoes, I soak them in a salt water solution to draw out some of the moisture – for about 30 to 60 minutes – then drain and pat dry. Works great! 🙂
Julie says
Soak them in water for an hour then drain, rinse, and dry. After they are mostly dry put in bag with 2-3 Tbsp corn starch and shake well until all potatoes are well coated. Put on already heated crinkled foil and drizzle with 2 tbsp olive oil and sprinkle seasonings on, stir together with a spatula until well mixed and bake on 425 for 20 mins, stir again and bake for additional 10-15 min!!! Super awesome fries 🙂
Jessica says
Hey! I love my sweet potatoes, and living in Japan I’m very spoilt as it’s eaten ‘normally’ here. Japanese satsumaimo type of sweet potato is much MUCH better for you than the standard one you have used in this recipe (like ours in Australia as well).
Satsumaimo has much less liquid so better for drier recipes too 🙂 less sugar as well as a yellow flesh (google for a comparison). The smaller ones are sweeter/wetter and closer to what we’re used to. My favourite way to cook it is simply to put it in foil whole and bake. They are sold on the streets rock-baked in newspaper, probably the most delicious, healthy snack I’ve had 🙂 Skin is the best part!
Thanks for your recipes, they are great!!